Manual firewall updates often happen at 2 a.m. during an outage. Pipelines mean those changes are rehearsed, automated, and safe.
This is the second post in a three-part series on Azure Firewall rules as code.
Last time, I showed how turning firewall rules into code gave me a modular, reusable foundation that fit perfectly with the project I was working on. But having the right code base is only half the story. The real power comes when you plug that foundation into Azure DevOps and let pipelines do the heavy lifting. By integrating firewall rules into CI/CD, we unlock all the good stuff that makes modern DevOps tick—branching strategies, pull requests, approvals, automated testing (this post doesn’t go into automated testing; that will come in part 3), and traceable deployments. Instead of manual updates at odd hours, firewall changes become part of a disciplined, collaborative workflow that scales with the team.
One thing I didn’t call out in the last post is that the hub deployment script I shared actually deployed all the resources into an Azure Deployment Stack. While Bicep doesn’t have state in the same way Terraform does, Deployment Stacks are a relatively new feature that bring some of that governance into play. I’ll probably dive deeper into them in a future post, but for this deployment I set the DenyWriteAndDelete flag on the stack. That means if you deploy locally, the resources are protected from modification by anyone in your tenant except the deployment object ID (which is you). Take it one step further with Azure DevOps and a service connection, and suddenly only the service principal can make changes — a guardrail I really like because it keeps everything under code control. Of course, there are plenty of other ways to protect resources with RBAC, Azure Policy, or a secure landing zone, but if you don’t have those in place yet, Deployment Stacks offer a quick win with built‑in guardrails.
The extract below shows the key parameters for the deployment stack
# Define the environment code as a variable
$EnvironmentCode = $env:ENVIRONMENT_CODE

$StackName = "hubnetworking".ToLower()

# Get current user object ID
$CurrentUserId = (Get-AzContext).Account.Id

try {
    $CurrentUserObjectId = (Get-AzADUser -UserPrincipalName $CurrentUserId).Id
} catch {
    Write-Error "Failed to get current user object ID: $_"
    exit 1
}

# Parameters necessary for deployment
$StackInputObject = @{
  Name                          = $StackName
  Location                      = $Location
  TemplateFile                  = $TemplateFile
  TemplateParameterFile         = $TemplateParameterFile
  ActionOnUnmanage              = 'detachAll'
  DenySettingsMode              = 'DenyWriteAndDelete'
  DenySettingsExcludedPrincipal = $CurrentUserObjectId
  DenySettingsApplyToChildScopes = $true
  WhatIf                        = $WhatIfEnabled
  Verbose                       = $true
}

Select-AzSubscription -SubscriptionId $SubscriptionId

Write-Host "Creating or updating deployment stack: $StackName"
New-AzSubscriptionDeploymentStack @StackInputObject -Force
With deployment stacks set up — and guardrails in place — the next focus is the FirewallRules.csv parameter file. This isn’t just a list of rules; it’s the single source of truth that keeps environments consistent. By making the CSV the definition of firewall policy, we can feed it straight into the CI/CD pipeline so every branch, pull request, and deployment uses the same baseline. In short, the CSV acts as the contract between developers, operators, and security, and the pipeline makes sure it’s enforced.
Before we set up any branch policies, let’s start with the pipeline itself, or more specifically, the one defined in the repo. It’s a straightforward setup: the trigger watches for pull requests that update the FirewallRules.csv, and only when those changes are merged into main does it run. At that point, the pipeline calls the same Invoke‑DeployFirewallPolicyRules.ps1 script we used in the last post to push the updated firewall rules.
NB: You will have to set the service connection details here in the below example
The pipeline itself is located here
# Deploy-Firewall-Rules.yaml
# -------------------------------------------------------------
# Azure DevOps pipeline for deploying Azure Firewall rules.
# Triggers on changes to FirewallRules.csv, supports PR validation, and
# runs resource provider enablement and firewall rule deployment stages.
#
# Stages:
#   - EnableResourceProviders: Checks and enables required Azure resource providers.
#   - Deploy: Deploys firewall rules using PowerShell and Azure CLI tasks.
#
# Parameters:
#   - env: Environment name (default: prd)
#
# Variables:
#   - ENVIRONMENT_NAME: Set from env parameter
#   - IS_PULL_REQUEST: Indicates if running in PR context
#   - ENV_FILE: Path to environment file
#   - azureConnection: Azure service connection (set by environment)
#
# Usage:
#   - On push or PR to main branch, pipeline validates and deploys firewall rules.
# -------------------------------------------------------------

name: Deploy-Firewall-Rules

trigger:
# YAML PR triggers are supported only in GitHub and Bitbucket Cloud.
# If you use Azure Repos Git, you can configure a branch policy for build validation to trigger your build pipeline for validation.
# https://learn.microsoft.com/en-us/azure/devops/repos/git/branch-policies#build-validation
  branches:
    include:
      - "main"
  paths:
    include:
      - "config/parameters/FirewallRules.csv"

pr:
  branches:
    include:
      - "main"
  paths:
    include:
      - "config/parameters/FirewallRules.csv"

parameters:
- name: env
  type: string
  default: 'prd'
  values:
  - prd

variables:
  - name: ENVIRONMENT_NAME
    value: ${{ parameters.env }}
  - name: IS_PULL_REQUEST
    value: "false"
  - name: ENV_FILE
    value: "$(System.DefaultWorkingDirectory)/config/${{ variables.ENVIRONMENT_NAME }}/.env"
  - name: azureConnection
  # sets the azureConnection var to the ADO library name aka service connection depending on the parameter selected
    ${{ if eq(lower(parameters['env']), 'prod') }}:
      value: ""

stages:
  - stage: Deploy
    displayName: 'Deploy'
    jobs:
     - deployment: deploy
       displayName: '🚀 Deploy Infrastructure'
       pool:
         vmImage: 'windows-latest'
       environment: ${{ variables.ENVIRONMENT_NAME }}
       strategy:
         runOnce:
           deploy:
             steps:
               - checkout: self
                 displayName: Checkout Repo

               - pwsh: |
                   (Get-Content -Path $env:ENV_FILE -Encoding UTF8) | ForEach-Object {$_ -replace '"',''} | Out-File -FilePath $env:ENV_FILE -Encoding UTF8
                 displayName: Remove Quotation Marks from Environment File

               - pwsh: |
                   Write-Host $env:ENV_FILE
                   Get-Content -Path $env:ENV_FILE -Encoding UTF8 | ForEach-Object {
                     $envVarName, $envVarValue = ($_ -replace '"','').split('=')
                     echo "##vso[task.setvariable variable=$envVarName;]$envVarValue"
                     echo "Set $envVarName to $envVarValue"
                   }
                 displayName: Import Environment Variables from File

               - task: AzurePowerShell@5
                 displayName: "Run the Deployment"
                 inputs:
                   azureSubscription: $(azureConnection)
                   azurePowerShellVersion: "LatestVersion"
                   pwsh: true
                   ScriptType: FilePath
                   ScriptPath: 'Firewall/pipeline-scripts/Invoke-DeployFirewallPolicyRules.ps1'
As a side note, if you’ve deployed the script using Deployment Stacks, you’ll need to make sure the service principal or workload identity object ID is included in the DenySettingsExcludedPrincipal parameter for the stack. You could also use DenySettingsExcludedAction, but I prefer DenySettingsExcludedPrincipal because it makes it clear exactly who performed the action and ensures only that identity has permission to do so.
Now that the pipeline is in place, the next step is to lock down the main branch with branch protection. This is something I consider non‑negotiable. It stops anyone from pushing directly to main and makes pull requests the only way to introduce changes. Pull requests aren’t just a formality, they create a clear review process, make changes traceable, and give the team a chance to catch issues before they hit production. Even in small teams, having at least one approver adds a layer of accountability. In larger teams, requiring multiple approvers strengthens that safety net. Automated checks like build validation, tests, and security scans will come later, I’ll cover those in the final post of this series, but branch protection is the foundation. It keeps quality high, reduces risk, and ensures we’re working in a way that scales.
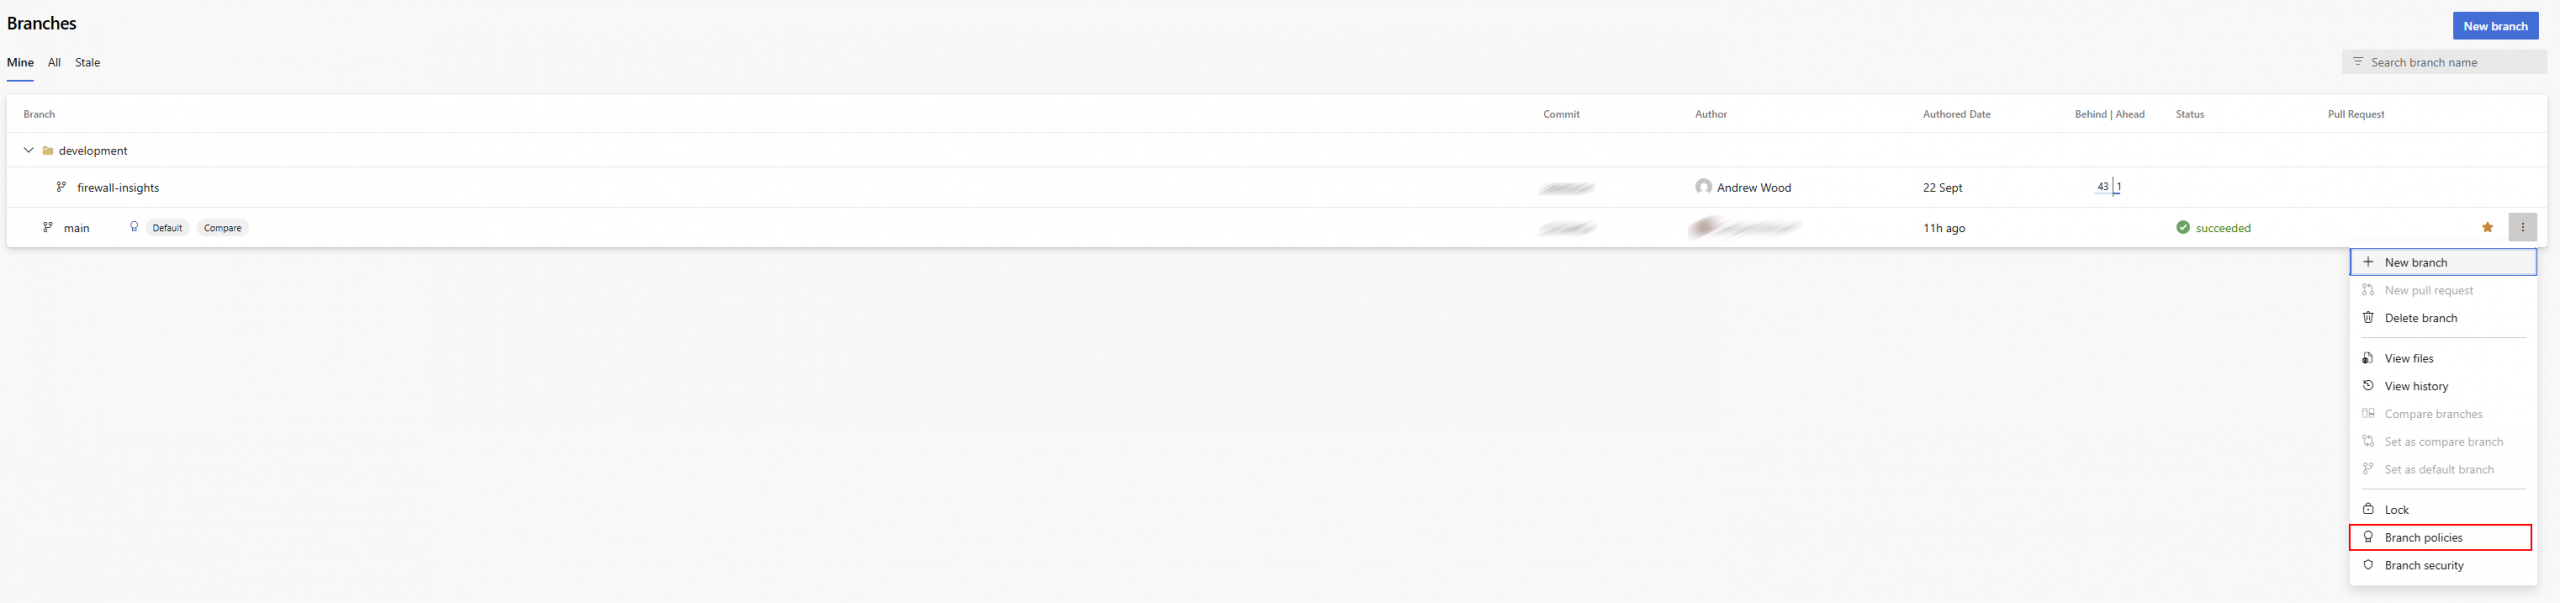
The next few images show a very basic branch protection setup for a small team. It’s not perfect, but it does the essentials: requiring pull requests and at least one other approver before changes can be merged. This simple configuration adds a layer of accountability and prevents direct pushes to the main branch, which is critical for maintaining code quality and reducing risk.
In the below screenshot – Select the Main branch and go to Branch Policies
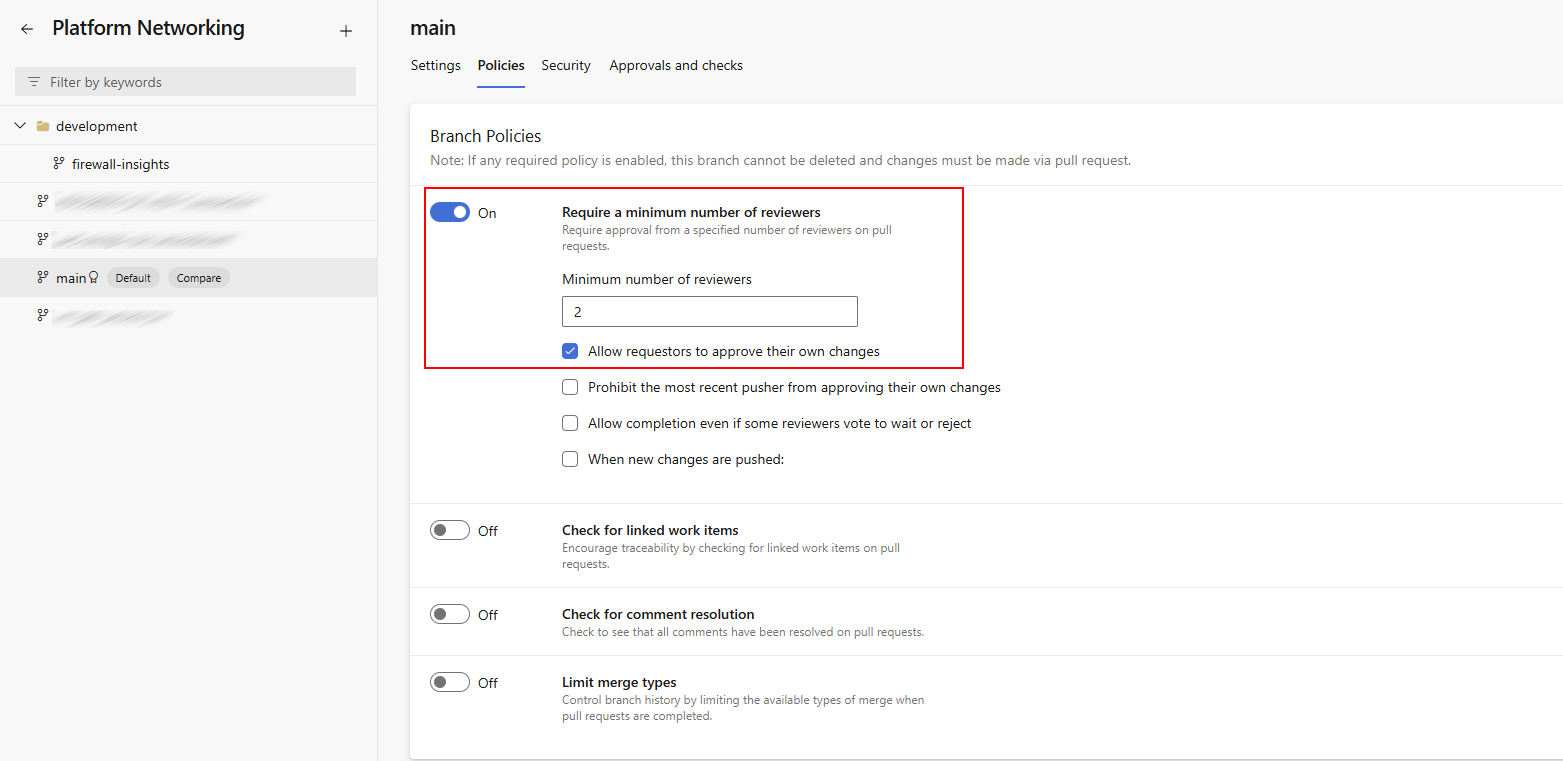
In this screenshot, you can see the branch policies applied to the main branch. I’ve set the minimum number of reviewers to two, which adds an extra layer of accountability. Because this is a small team, we’ve allowed requestors to approve their own changes to keep things practical. In larger teams, I’d recommend disabling that option to maintain a stronger separation of duties and ensure independent review.
In the final screenshot, I’m setting up automatic approvers. I like to do this to ensure consistency in who reviews changes and to make sure the right roles are involved in the approval process. This helps maintain a clear standard for code quality and security, rather than leaving it to chance or convenience.

In the final post of this series, we’ll add automated testing to catch issues like any-any rules and CSV formatting errors before they reach production.
How do you implement CICD? Have you got any thoughts on Deployment Stacks? Got feedback or ideas? Drop a comment or connect on LinkedIn
I’d love to hear how you’re tackling firewall automation.